ViewMe SB Lighting Kit
The two ViewMe fixtures are provided with BOTH mounting options. The bracket mounts allow you to attached to the top or sides of your computer screen with adjustable yokes for aiming. When using the stand mounts, the fixtures can be placed on each side of your computer screen, your video capable laptop or mobile device. The adjustable height stands allow versatile placement of your comfortable, indirect lighting. Lighting that actually flatters you, defining your features while eliminating severe shadows.
ONOFFTechnical Specification
Designed & Manufactured in the U.S.A.
Specifications
Housing
Constructed of 22 gauge CRS, then coated with durable black textured TGIC polyester powder coat finish.
LED Modules
Osram/Sylvania HF2 Narrow Stick LEDs. Fixtures are 3.4 watts each and produce a soft, even coverage wash of 3000K light. LED is 85 CRI with a rated life of 50,000 hours.
Reflector
Precisely formed aluminum reflector is coated in durable, highly reflective, white TGIC polyester powder coat finish. Indirect design provides comfortable, soft illumination.
Electrical
Power supply unit is a 120 thru 230 volts 50/60 Hz transformer. It is 24 volt, DC Class 2, with plug for any standard electrical 120 volt outlet. UL, CUL, CE Listed. RoHS Compliant. Fixtures operate silently and include an on/off button on the master unit. Jumper cable powers the second unit from the master unit.
Packaging
Boxed in heavy 200# corrugated cardboard with formed foam insert, your kit is well protected for portable use.
Stand Mounting
Stand Mounted with weighted base. Stand heights adjusts from 14" to 20" for versatile placement on each side of your computer screen, your video capable laptop or mobile device.
Bracket Mounting
Bracket Mounted with formed 18 gauge CRS yokes. Units may tilt for aiming and can be locked in place. Brackets secure to the top or sides of your computer screen with double sided Velcro tape (supplied).
 Stand Instructions
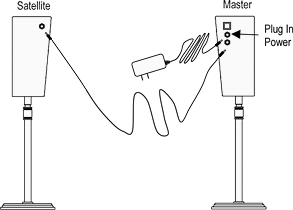
Plug power driver into the hole closest to the On/Off button (Only Master fixture). Plug Jumper cable into the second hole and then into the Satellite fixture.
Stands may be raised and lowered to your preferred height by loosening adjusting, then tightening the locking nut on stand.
 Bracket Instructions
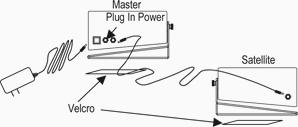
Plug power driver into the hole closest to the On/Off button (Only Master fixture). Plug Jumper cable into the second hole and then into the Satellite fixture.
Attach Velcro tape to the bottom of the bracket to secure to your monitor. Loosen thumb screw to tilt fixture to desired position and tighten in place.